Pages

Tuesday, April 30, 2013

Bossche Bollen

I wanted to create something similar to a cream puff, but just a little bit different. In my hunt, I came across a Dutch treat called bossche bollen. It consists of a pastry puff filled with whipped cream and then completely covered in chocolate. Sounds divine right? Also perhaps a little bit messy...
You start by making the pastry puff. When I made them the first time I took them out from the oven when they were just becoming golden brown. Turns out, they were undercooked.  I ended up tossing the batch (luckily it only makes about 4). The second time I made sure that they were nice and golden all over, like so:
That put their time in the oven to more like 25-27 minutes versus the 20-25 minutes the recipe initially calls for. I know each oven is different though, so I left the time the same in the actual recipe. 
They were delicious, and should really be eaten within the same day they were made (no trouble with that here...) otherwise the pastry part gets very soft, like when cream puffs are filled for too long. 
Next time, per hubby's request, I will try it with a custard filling versus whipped cream. Can't wait!

Bossche Bollen
{adapted from The Dutch Table}
Makes 4

Ingredients
  • 1/3 cup water
  • 2 tablespoons butter
  • 1/3 cup flour
  • 1 egg, beaten
  • 1 pinch of salt
  • 1/2 cup heavy cream
  • 1-2 tablespoons powdered sugar
  • 3/4 cup semi-sweet chocolate chips
  • 1 tablespoon vegetable oil
Directions
  1. Preheat oven to 375 degrees F. Line a baking sheet with parchment paper.
  2. Heat the water and butter in a saucepan over medium heat. Bring to a boil, then remove from heat and add flour. Combine until mixture forms a ball. Add the pinch of salt and egg. Stir until fully combined.
  3. Divide the dough into 4 balls and place onto the parchment-lined baking sheet. Bake for 20-25 minutes or until puffy and golden. Cool on wire rack.
  4. Beat the heavy cream and 1 tablespoon of the sugar until stiff peaks form. Taste the cream and add another tablespoon of sugar if desired. Poke a hole in the bottom of each puff and then use a piping bag to fill each with whipped cream.
  5. Melt the chocolate chips over a double boiler and add the tablespoon of oil. Stir until combined and then let chocolate cool for a few minutes. Then dip the puffs head first into the chocolate (or spoon chocolate over the puffs on a wire rack).
  6. Cool in the refrigerator for about 20 minutes, or until chocolate is hardened.

Friday, April 26, 2013

Berry Almond Chocolate Cupcakes

The initial idea for this recipe came from here, but I prefer anything mini over full size. Some may say it's because I am so short myself, but really, who doesn't love more bite-sized treats? So I went for a cupcake version.

I'm not sure how all the sprinkles ended up in a line...couldn't have done that if I tried!

And I couldn't resist making mini cupcakes too!


You start by making the cupcakes (duh!), and then once they are cooled you make a hole in them. If you have one of those nifty cupcake corers you could use that, or you can do what I did and press the bottom of a large piping tip into the center of the cupcake to remove the insides.


The original recipe called for a raspberry buttercream (which I used as a filling), but I wanted to change things up a bit and did a mixed berry buttercream. I used about 6 ounces of strawberries, 3 ounces of blueberries and 3 ounces of raspberries. You can use any combination you want, but my heart belongs to strawberries so they had to be the dominant berry for me. 

To start making the filling you need to make a berry reduction. The end result is a very dark and thick purple/red syrup.

I know I was nervous about overcooking it, so don't be afraid to taste it as you go ;)
After adding it to the buttercream mixture I piped it into the holes in the cupcakes.


Then spread the ganache on top. I found that the easiest way to do this is place a dollop of the ganache in the center of the cupcake using a spoon, and then use a knife to spread it evenly over the top of each cupcake.


Then all that was left was to frost them with some dark chocolate frosting! The frosting was VERY creamy when I made it so I popped it into the refrigerator while I was assembling the rest of the cupcakes. That made it much easier to pipe!


Also, to really pack on the frosting you may need to double the recipe. But I would say this is a less-is-more type of recipe...if you put too much frosting on the top, it will overpower the delicious, fruity insides...

A view from the inside...

 And that would be a shame! The berry buttercream really is yummy!

Berry Almond Chocolate Cupcakes
Makes about 24 cupcakes

For the cupcakes:
{adapted from Martha Stewart}

Ingredients
  • 3/4 cup unsweetened cocoa powder
  • 1 1/2 cups all-purpose flour
  • 1 1/2 cups sugar
  • 1 1/2 teaspoons baking soda
  • 3/4 teaspoon baking powder
  • 3/4 teaspoon salt
  • 2 large eggs
  • 3/4 cup buttermilk
  • 3/4 cup warm water
  • 3 tablespoons vegetable oil
  • 1 teaspoon vanilla extract
Directions
  1. Preheat the oven to 350 degrees F and place cupcake liners in pans. Sift cocoa powder, flour, sugar, baking soda, baking powder and salt in the bowl of a mixer. Beat on low speed until just combined. Increase speed to medium and add eggs, buttermilk, water, oil and vanilla. Beat until smooth- about 3 minutes.
  2. Fill cupcake liners about 2/3 full. Bake for 20-25 minutes or until toothpick comes out clean from the center of cupcakes. Let cool in pans for 1 minute and then remove and place on wire rack to cool completely. 
For the almond milk chocolate ganache:
{adapted from parsleysagesweet.com}

Ingredients
  • 4 1/2 ounces chopped milk chocolate
  • 1/2 cup heavy cream
  • 1/3 cup whole raw almonds (then either smashed in ziploc bag or blended in food processor with 1/2 tsp sugar)
Directions

Place the chopped milk chocolate in small heatproof bowl. Heat the heavy cream in a saucepan until its just about to boil. Pour heavy cream over chocolate and let it sit for 2-3 minutes. Then stir until smooth. Add in smashed/blended almonds. Refrigerate for at least 1 hour.

For the berry buttercream:

Ingredients
  • 12 ounces mixed berries
  • 1/2 cup (1 stick) salted butter, softened
  • 1/2 teaspoon lemon juice
  • 1 1/2 cups to 2 1/2 cups powdered sugar
Directions
  1. Place the berries in a medium saucepan, and begin to cook over medium heat until they break down into a sauce. You can mash any stubborn berries, such as strawberries or blueberries. Strain over a fine mesh sieve into a bowl (you should have about 1/2 cup juice). Pour strained liquid into a a clean saucepan and continue to cook over medium heat until it becomes thick, syrupy and dark (there should be about 1/4 cup of juice left). Place in refrigerator, or set aside, until completely cool.
  2. In mixer beat butter until creamy. Add cooled berry reduction, lemon juice, and 1 cup powdered sugar. Beat until creamy and uniform in color. Slowly add more powdered sugar until desired consistency is reached (I only added 1/2 cup more). If too much powdered sugar is added, you can thin it out with a little milk or cream.
For the dark chocolate frosting
{adapted from Martha Stewart}

Ingredients
  • 1/4 cup plus 1 1/2 teaspoons cocoa powder
  • 1/4 cup plus 1 1/2 teaspoons boiling water
  • 1 cup plus 2 tablespoons salted butter, softened
  • 2 tablespoons powdered sugar
  • 12 ounces semisweet chocolate, melted and cooled
Directions

Combine cocoa powder and boiling water, stirring until cocoa has dissolved. With an electric mixer, beat butter and powdered sugar on high speed until fluffy and pale. Reduce speed to low. Add melted and cooled chocolate, beating until combined. Scrape down sides of bowl to ensure all ingredients are fully incorporated. Beat in the cocoa mixture until smooth. Refrigerate until needed.

Assembly

Make a hole in the cooled cupcakes using either a cupcake corer or the end of a piping tip. Using a piping bag, fill cupcakes with berry buttercream. Spread almond milk chocolate ganache on top of each cupcake. Then frost with dark chocolate frosting.

Tuesday, April 23, 2013

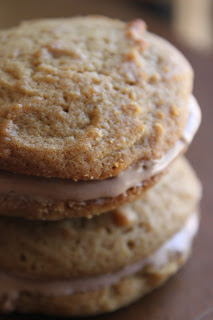
Peanut Butter Whoopie Pies with Nutella Marshmallow Cream

I have always loved the hazelnutty, chocolatey, deliciousness of Nutella. In fact, one of my most common lunches growing up was a peanut butter and Nutella sandwich. I was actually  more likely to have that than a peanut butter and jelly sandwich, and you never heard me complaining! This dessert is reminiscent of that yummy treat.
In my quest to create this dessert, I could not find a peanut butter whoopie pie recipe online anywhere. A lot of the recipes had a peanut butter filling, but not a peanut buttery cake part. So, I decided to create my own bit of peanut butter heaven. It came out soft and moist and not overwhelmingly sweet, which was the perfect complement to the filling. Ah, the filling- the Nutella filling was a little bit of a challenge; I didn't want to do a buttercream, but rather a marshmallow frosting. Adding the Nutella to the marshmallow frosting wasn't the greatest idea, as it made it far too liquidy (that stuff is pretty sensitive!). So in an attempt to save it, I added cream cheese. Although it was still a little more runny than is probably ideal for a filling, it sits delightfully inside its peanut buttery cakey sandwich and is still delicious.

Although none of my expert taste testers (namely, my husband) complained, the next time I make these, I think I will try a sturdier filling. Maybe a buttercream based  filling, or whipped cream, or just cream cheese....so many options! I can't wait!

As I was rereading this post, I realized that quite a few words that were written are not necessarily recognized by the English language as real words. However, I left them as is because I feel that maybe the folks at Merriam-Webster should reconsider. I think words like cakey, liquidy, chocolatey, etc would all be wonderful additions to the English language, don't you? It sure would make my life easier. 


Peanut Butter Whoopie Pies with Nutella Marshmallow Cream
Makes about 18 whoopie pies

For the cookie:

Ingredients
  • 1 2/3 cups flour
  • 1 teaspoon baking powder
  • 3/4 teaspoon baking soda
  • 1/4 teaspoon salt
  • 4 tablespoons unsalted butter, softened
  • 4 tablespoons shortening
  • 3/4 cup packed dark brown sugar
  • 2/3 cup creamy peanut butter
  • 2 large eggs
  • 1/4 cup buttermilk
  • 1 teaspoon vanilla
Directions
  1. Preheat oven to 375 degree F. Line 2 baking sheets with parchment paper
  2. In a medium bowl, whisk together flour, baking powder, baking soda, and salt.
  3. Using a mixer, beat the butter, shortening and dark brown sugar on medium speed until light and creamy, about 3 minutes. Add the peanut butter and continue to beat until smooth. Add the eggs and beat until combined.
  4. Gradually add the flour mixture, alternating with the buttermilk, in several additions. Add the vanilla and beat until combined.
  5. Using a cookie scoop (mine was 1 1/2 tbsp) drop balls of dough onto the prepared baking sheet, leaving about 2 inches of space between the cookies. Bake the cookies for about 10 minutes, or until a toothpick comes out clean from the center of the cookie and edges are just turning golden brown. Let the cookies cool on baking sheet for 1-2 minutes before transferring to wire rack to cool completely.
For the filling
{adapted from Martha Stewart}

Ingredients
  • 4 large egg whites
  • 1 cup sugar
  • 1/2 teaspoon cream of tartar
  • 1 teaspoon vanilla
  • 1- 8 oz block of cream cheese, softened
  • 1/2-3/4 cups Nutella
Directions
  1. Place egg whites, sugar and cream of tartar in the heatproof bowl of an electric mixer. Set bowl over a saucepan of simmering water, ensuring that the bowl is not touching the water. Whisk constantly until sugar is dissolved and the mixture is warm to the touch, about 3-4 minutes. 
  2. Transfer the bowl to the electric mixer. Using the whisk attachment, start on low speed and gradually increase to high, until stiff, glossy peaks form, 5 - 7 minutes. Add vanilla and mix until combined. Transfer to new bowl.
  3. In clean bowl of mixer, beat cream cheese with paddle attachment until smooth. Start by adding in 1/2 cup of Nutella. Then gradually add in marshmallow cream mixture until desired texture is achieved. Add additional Nutella if needed.
Assembly

Pipe or spoon filling onto the bottom of one cookie. I learned (by very messy trial and error) that it's best to let the filling sit on the bottom half of the cookie for about 5 minutes before placing another cookie on top. It seemed to stiffen up more that way. If there is leftover plain marshmallow filling, feel free to use that instead of the Nutella mixture in some of the whoopie pies if desired!

Friday, April 19, 2013

Strawberry Almond Cupcakes

It is spring isn't it? As many upstate New Yorkers know,  even though the calendar says it's spring, doesn't mean that Mother Nature chooses to listen. With all this 30 degrees one day, then 70 degrees the next day nonsense, I am starting to get antsy. So since I have yet to be able to control the weather (unfortunately), I figured I'd try to send some good juju into the world by baking up something suited for the spring time- strawberry almond cupcakes. 
I saw a recipe a while ago for strawberry cheesecake mousse, which I have been dying to try to make and I figured why not put it in the middle of a cupcake? Why not an almond cupcake? With whipped cream and roasted almonds on top? This way, even if the weather doesn't cooperate, I'll have a delicious treat to distract me.
Here's to hoping this peace offering is enough to have Mother Nature bringing some sunshine very soon!


Strawberry Almond Cupcakes
Makes 12 cupcakes
{adapted from glorioustreats.com and allrecipes.com}

For the cupcakes:

Ingredients
  • 1 1/2 cups flour
  • 1 3/4 teaspoons baking powder
  • 1 cup white sugar
  • 1/2 cup unsalted butter, softened
  • 2 eggs
  • 1 teaspoon vanilla extract
  • 1 teaspoon almond extract
  • 3/4 cup milk
  • 24 raw almonds (for garnish)
Directions
  1.  Preheat oven to 350 degrees F (175 degrees C). Line 12 cupcake cups with liners. In a bowl, whisk together flour and baking powder.
  2. Using a mixer, cream together sugar and butter until well blended. Beat in the eggs, one at a time, until combined. Stir in vanilla and almond extracts. Gradually beat in the flour mixture, alternating with the milk, in several additions. Spoon the batter into the prepared cupcake liners, filling them about 2/3 full.
  3. Bake the cupcakes for 20-25 minutes, or until a toothpick inserted into the center of the cupcakes comes out clean.
  4. To roast almonds: while the oven is still preheated to 350 degrees F, spread the almonds out onto a baking sheet. Place in the oven for 10-12 minutes, or until golden brown and fragrant. Let cool before using for garnish.
For the filling:

Ingredients
  • 1/2 cup fresh or frozen whole strawberries
  • 1/2 cup heavy whipping cream
  • 2 tablespoons powdered sugar
  • 1- 8 oz block of cream cheese
  • 1/3 cup powdered sugar
  • 1/2 teaspoon vanilla extract
Directions
  1. In a food processor, or blender, chop/blend fresh or frozen (and slightly thawed) strawberries. Process until strawberries are chopped, juicy and no piece is larger than a pea. Set puree aside.
  2. Using a mixer, whip heavy cream until it begins to thicken. Add 2 tablespoons powdered sugar and continue to whip until stiff peaks form. Move whipped cream to separate bowl.
  3. Beat cream cheese with mixer until smooth. Add 1/3 cup powdered sugar and continue to beat. Stir in vanilla, then add in strawberry puree (made in step 1) a little at a time. Beat until fully incorporated.
  4. Fold cream cheese mixture into the whipped cream until fully combined.
For the frosting:

Ingredients
  • 2 cups heavy cream
  • 1 1/2 tablespoons powdered sugar
  • 1 tablespoon cold water
  • 1 teaspoon unflavored gelatin
Directions
  1. Whip cream with powdered sugar until soft peaks form. Dissolve gelatin in water over low heat (or place in microwave for about 10 seconds). Remove from heat, allow to cool slightly, then whip into cream until stiff peaks form.
Assembly

Make a hole in the cooled cupcakes using the cone method (cut a cone shape out of the top of the cupcake, then cut the pointed bottom off to leave you with a flat circular piece of cake to place back over the hole after filling). Then spoon or pipe in the strawberry filling. Replace the circular piece of cake over the hole. Then pipe whipped cream on top of cupcake for frosting. Garnish with 2 roasted almonds on each cupcake.

Tuesday, April 16, 2013

Chocolate Lasagna

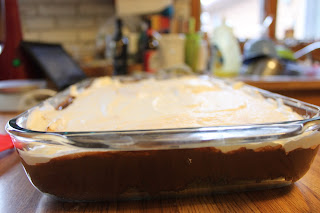
One thing I especially love to do is bake for other people. Don't get me wrong, I like to indulge in desserts myself, but there is something about giving delicious baked goods to others that puts a smile on my face. That's why it only seemed right to have my first post be something that I made for one of my co-workers- Chocolate Lasagna. Yes, that's right, CHOCOLATE lasagna. My Italian roots were intrigued. Obviously, I love lasagna, but CHOCOLATE lasagna? I was a little skeptical at first, but once I was shown a picture of it, I was sold.
Clearly, I'm hoping you are just as easily persuaded ;)
The one downfall in the recipe (in my eyes) was that there was really nothing made from scratch, just combining already delicious things. Now, there's nothing wrong with that, but I have been in a from-scratch kind of mood lately, so I used homemade stabilized whipped cream instead of the Cool Whip.
mmm whipped cream :)
The process of it all is very simple. It starts with a crushed Oreo crust.
Then has a cream cheese/whipped cream layer. It was a little hard to keep the crushed Oreo crumbs out of this layer, but I figured having a cookies-and-cream-esque layer wasn't anything to complain about.
Then a chocolate pudding layer, which kind of hid the cream cheese layer, but I promise it's still in there!
Then top it off with some more whipped cream...
and mini chocolate chips.
Now, I had to bring this into work the next day, but obviously I couldn't risk bringing in something that tasted sub-par, so I sunk a spoon into a corner, and was immediately transported to chocolately heaven.
Hardly noticeable right?
Enjoy!

Chocolate Lasagna
{adapted from centercutcook.com}

INGREDIENTS
  • 1 package regular Oreo cookies
  • 6 tablespoons butter, melted
  • 1- 8 ounce package cream cheese, softened
  • 1/4 cup granulated sugar
  • 2 tablespoons cold milk
  • 2 cups heavy cream
  • 1 1/2 tablespoons powdered sugar
  • 1 tablespoon cold water
  • 1 teaspoon unflavored gelatin
  • 2 – 3.9 ounce packages chocolate instant pudding
  • 3 1/4 cups cold milk
  • 1 1/2 cups mini chocolate chips
DIRECTIONS
  1. Crush the Oreos until very fine using either a food processor or a ziploc bag and rolling pin. The food processor makes it much easier to get the crumbs very fine, but the more cathartic route definitely involves the rolling pin.
  2. Transfer the Oreos crumbs to a medium bowl and mix in the melted butter using a fork. Once the butter is evenly distributed, transfer the mixture to a 9" x 13" pan and press into the bottom to form a crust. Place the pan into the refrigerator while working on the other steps.
  3. Whip the cream with the powdered sugar until soft peaks form. Dissolve the gelatin in water over low heat (or place both in the microwave for 10 seconds). Allow the gelatin/water mixture to cool slightly, then whip into cream until stiff peaks form. Transfer to a new bowl.
  4. Using a clean bowl, mix the cream cheese with a mixer until light and fluffy. Add in 2 tbsp of milk and the granulated sugar and mix well. Fold in 1 1/2 cups whipped cream. Spread this mixture over the crust.
  5. In a medium bowl, combine chocolate instant pudding and 3 1/4 cups milk. Whisk for a few minutes until the mixture starts to thicken. Spread over the cream cheese layer. Allow the dessert to rest for 5 minutes until the next step so that the pudding can firm up.
  6. Spread the remaining whipped cream over the top. Sprinkle the mini chocolate chips on top of the whipped cream. Place in the freezer for 1 hour or refrigerate 4 hours prior to serving.