Pages

Friday, June 28, 2013

Giraffe Cupcakes

I'm not sure where my sister's love for giraffes came from, but she has loved them for as long as I can remember. She has a giraffe print room, giraffe clothes, giraffe shoes, giraffe posters...you get it. It truly is an obsession. So it was an obvious choice to make giraffe cupcakes for her graduation party.


These cupcakes not only have an adorable fondant giraffe on top, but are giraffe print on the inside as well!

And I also found these adorable giraffe print liners!

As a short cut, you could use boxed brownie mix for the spots, but I made my brownies from scratch. Either way, the brownies are the first thing you make. Then you make the yellow cupcake batter.  I added a little bit of yellow food coloring to the batter to really bring out the yellow color. Once the yellow cake batter is mixed you can break apart the brownie and add a few pieces of it to the bottom of the liners.


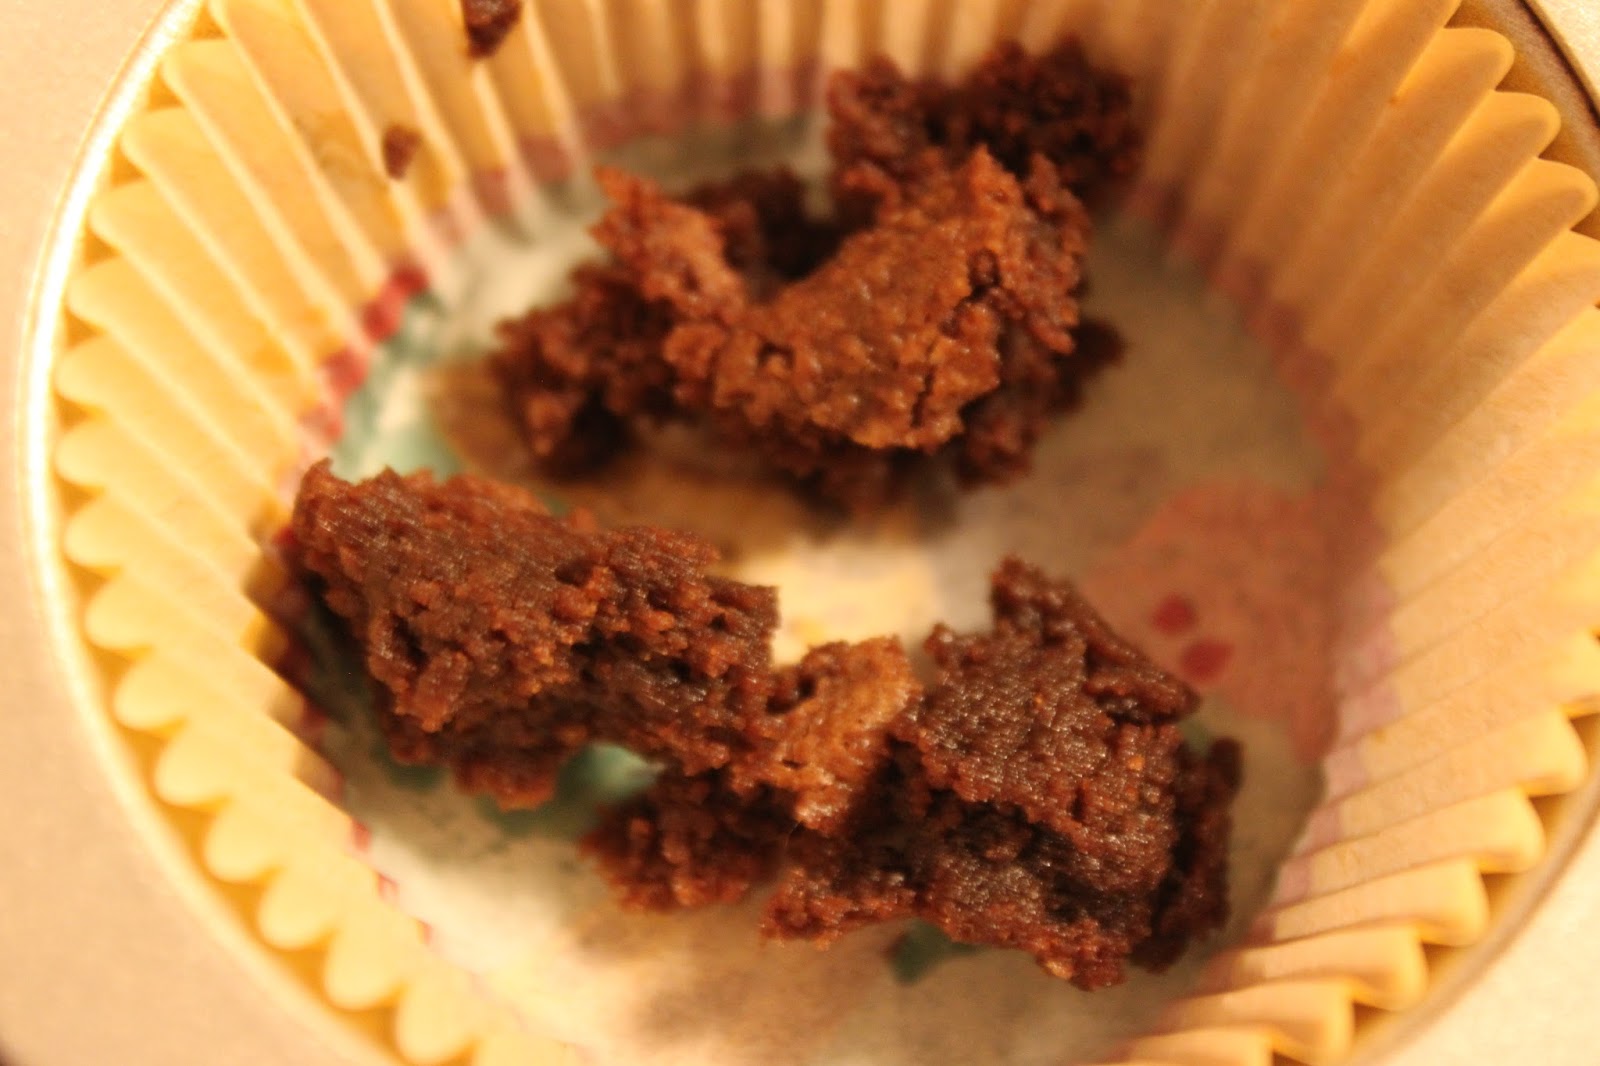
Then top it with  1 1/2 tablespoons of batter. Then add a few more pieces of brownie.

Finish it off with another 1 1/2 tablespoons of batter. Now it's ready to bake!

For the frosting I made a vanilla buttercream. I think next time I might do chocolate at least on some to go with the giraffe spots.

Overall I was ecstatic about how these cupcakes came out! Cute and delicious!


*If you are interested in the fondant recipe I used, look here

Giraffe Cupcakes
Makes 24 cupcakes

For the brownies
{recipe from allrecipes.com}

Ingredients
  • 1/2 cup unsalted butter
  • 1 cup sugar
  • 2 eggs
  • 1 teaspoon vanilla extract
  • 1/3 cup unsweetened cocoa powder
  • 1/2 cup all-purpose flour
  • 1/4 teaspoon salt
  • 1/4 teaspoon baking powder
Directions
  1. Preheat oven to 350 degrees F. Grease and flour an 8 inch square pan
  2. In a large saucepan or microwave, melt butter. Remove from heat and stir in sugar, eggs and vanilla. Beat in cocoa powder, flour, salt and baking powder until smooth. Spread into prepared pan.
  3. Bake in preheated oven for 25 - 30 minutes. Cool completely.
For yellow cupcakes and creation of giraffe print
{yellow cupcake recipe slightly adapted from Taste of Home}

Ingredients
  • 2/3 cup unsalted butter, softened
  • 1 3/4 cups sugar
  • 2 eggs
  • 1 1/2 teaspoons vanilla extract
  • 2 1/2 cups all-purpose flour
  • 2 1/2 teaspoons baking powder
  • 1/2 teaspoon salt
  • 1 1/4 cups 2% milk
  • 1/4 teaspoon gel food coloring (or as much as needed to make batter more yellow)
Directions
  1. Preheat oven to 350 degrees F. Line a cupcake pan with liners.
  2.  In a large bowl, cream butter and sugar until light fluffy. Add eggs one at a time, beating well after each addition. Beat in vanilla. In a separate bowl, whisk together flour, baking powder and salt. Add to creamed mixture alternately with milk, beating well after each addition. Add yellow food coloring until a vibrant yellow color is apparent.
  3. Cut cooled brownie into small chunks and add a few pieces to the bottom of each cupcake liner. Spoon 1 1/2 tablespoons of yellow cupcake batter on top, trying to cover the brownie pieces the best you can. Add another few pieces of brownie and then cover with another 1 1/2 tablespoons of batter.
  4. Bake for 15 - 20 minutes, or until a toothpick inserted into the center comes out clean. Cool 10 minutes in pan before moving to wire rac


    k to cool completely.
For the vanilla buttercream
{recipe adapted from Sally's Baking Addiction}
*You may need to make more frosting depending on how much you frost the cupcakes*

Ingredients
  • 1 cup salted butter, softened
  • 3-4 cups powdered sugar
  • 1/4 cup heavy cream
  • 1 teaspoon vanilla extract
Directions

Beat butter on medium speed for about 3 minutes, until smooth and creamy. Add powdered sugar, cream and vanilla with mixer running. Increase to high speed and beat for 3 minutes. Add more powdered sugar if too thin or more cream if too thick. Use to frost cooled cupcakes and decorate as desired.

Saturday, June 22, 2013

Blue Velvet Cookie Dough Graduation Cupcakes

My baby sister graduated from high school this past Wednesday and besides making me feel old, it put me in a celebratory baking mood! For her party over the weekend I made two types of cupcakes, these blue velvet cookie dough cupcakes, and some giraffe themed cupcakes that I will be posting about soon!

My sister wanted red velvet cupcakes, but her school colors are white and blue, so I had  to dye them blue! And I wanted a little bit more of a twist on the norm so I added some cookie dough filling to the inside! 

I know, they don't look very blue in this picture...
The blue coloring did come out fairly dark and more of a blue-green, but it served its purpose!


Cookie dough filling!

The process is pretty basic- make a red velvet cupcake recipe but substitute the blue food coloring for the red. Then make the chocolate chip cookie dough to fill the center of the cupcakes after they are done baking. Yes, this cookie dough is edible without baking (no eggs) and you will have left over! No one will judge you for eliminating waste by eating spoonfuls of it afterwards. Then you add cream cheese frosting to the top.


Decoration is up to you, but since it was a graduation party, I decided to do little graduation caps out of marshmallow fondant (recipe can be found here). 

They were a hit! And it was like 2 treats in 1 with the cookie dough in the center!

Blue Velvet Cookie Dough Cupcakes
{Makes about 24 cupcakes}

For the cupcake:

Ingredients
  • 1/2 cup vegetable shortening
  • 1 1/2 cups sugar
  • 2 eggs
  • 1 teaspoon vanilla extract
  • 2 1/4 cups all-purpose flour
  • 1 teaspoon salt
  • 1/4 cup cocoa powder
  • 1/2 teaspoon blue gel food coloring
  • 1 cup buttermilk
  • 1 teaspoon white vinegar
  • 1 teaspoon baking soda
Directions
  1. Preheat oven to 350 degrees F. Line cupcake pan with liners.
  2. In bowl of electric mixer cream shortening and sugar until fluffy. Add eggs, 1 at a time, beating after each addition. Add vanilla.
  3. In a separate bowl whisk together the flour, cocoa and salt.
  4. Add 1/3 of flour mixture to shortening mixture and beat on low. Add half of the buttermilk. Alternate adding flour mixture and buttermilk, ending with flour mixture. Add food coloring. 
  5. In a small bowl, combine vinegar and baking soda. Add to cake batter, mixing until just combined. 
  6. Pour batter into prepared liners about 3/4 full. Bake for 12 - 15  minutes or until toothpick comes out clean. Cool in pan for 10 minutes before moving to wire racks to cool completely.
For the filling
{recipe from Sweet Anna's}

Ingredients
  • 3/4 cup unsalted butter
  • 3/4 cup packed brown sugar
  • 3/4 cup sugar
  • 3 tablespoons milk
  • 1 1/2 teaspoons vanilla extract
  • 1 1/2 cups all-purpose flour
  • 1 1/2 cups mini chocolate chips
Directions

Using a mixer, cream together butter and both sugars until smooth. Mix in milk and vanilla until smooth. Mix in flour until just combined. Add more milk if creamier texture needed. Then stir in mini chocolate chips. Make a hole in the cupcakes and then fill with cookie dough.

For the frosting

Ingredients
  • 3/4 cup salted butter, firm not cold
  • 9 ounces cream cheese
  • 3/4 teaspoon vanilla extract
  • 5 1/4 cups powdered sugar
Directions
  1. Beat butter and and cream cheese until pale and fluffy (about 1 minute on high speed, and 3-4 minutes on medium speed).
  2. Mix in vanilla.
  3. Add powdered sugar and beat until smooth. Use to frost cupcakes.


Saturday, June 15, 2013

Chocolate Cream Cheese Cupcakes

These cupcakes are so delicious they don't even need frosting!


They would actually be the perfect treat for hubby if it wasn't for the cream cheese filling (he isn't a huge fan of frosting either). So since he wouldn't even take a bite of one,  I valiantly undertook the task of eating the leftovers all by myself. I really am a martyr.

To make these delicious bites of heaven, you first make up the filling, and then the chocolate cake batter using a mixer.

I'm assuming you can guess which is the filling and which is the cupcake batter...

Then you fill your cupcake liners with the chocolate batter first, about 2/3 full. After that you add about 1 tablespoon of the cream cheese mixture. I added 1 level tablespoon of filling to each cupcake, and probably could have gone with a little more in each (I had filling leftover). 
I completely forgot to take a before picture of my regular-sized cupcakes, but I made mini ones (shocking, I know) and here's the picture of them:


For the mini cupcakes, I added 2 teaspoons of batter and about 1 1/2 teaspoons of the cream cheese mixture. Bake for 20- 25 minutes (about 15 - 18 minutes for the smaller ones). After they're done, let them cool in the pan for 5 minutes and then cool them completely on a wire rack. They definitely taste better after refrigerating, when the cream cheese filling is nice and cold.

As I put the last pan in the oven, I got to thinking that it would be interesting to try to make shapes out of the cream cheese mixture (although probably difficult) to make designs on top of the cupcakes, but it was too late; everything was already baking away. Luckily, my subconscious must have been on my side because when I pulled them out of the oven look what I found!

 
A little heart shape! So cute!


And so yummy! I decided to bring them into work the next day for a (healthy) breakfast.... there were definitely no complaints!


Chocolate Cream Cheese Cupcakes
Makes 30 cupcakes
{recipe slightly adapted  from The Capitol Baker}

Ingredients

For the filling:
  • 8 ounces cream cheese
  • 1/3 cup sugar
  • 1 egg
  • 1/8 teaspoon salt
  • 1 cup mini semi-sweet chocolate chips
For the cupcake:
  • 3 cups all-purpose flour
  • 2 cups sugar
  • 2/3 cup cocoa powder
  • 2 teaspoons baking soda
  • 1 teaspoon salt
  • 2 cups water
  • 2/3 cup vegetable oil
  • 2 tablespoons white vinegar
  • 2 teaspoons vanilla extract
Directions
  1. Preheat oven to 350 degrees F. Line cupcake pan with liners.
  2. Prepare filling by beating cream cheese, sugar, egg, and salt in bowl until smooth and creamy. Stir in chocolate chips.
  3. Prepare the cupcake batter separately by whisking the flour, sugar, cocoa powder, baking soda and salt in large bowl. Add the water, oil, vinegar and vanilla, and beat on low speed for about 3 minutes. 
  4. Fill cupcake liners about 2/3 full with batter. Spoon 1 - 1 1/2 tablespoons of filling into the center of each cupcake.
  5. Bake for 20 - 25 minutes, or until toothpick inserted into the cake portion comes out clean. Let cool for 5 minutes in the pans, then transfer to wire rack to cool completely. Refrigerate once cool.

Friday, June 7, 2013

Peanut Butter Stuffed Hot Fudge Cupcakes


Yum. The name alone had me drooling. I had to try them! The chocolate cake is so moist and delicious, it's probably my favorite chocolate cupcake recipe I've ever made. I mean, it is just THAT good. And obviously, the addition of peanut butter doesn't hurt anything.

I think one of the key reasons why the cupcake is so moist is that you include some homemade hot fudge into the cupcake.


It makes the cupcake process a little longer, but it also makes a lot of extra hot fudge that lasts up to 2 weeks in the refrigerator. So, if you don't want to just eat the leftover fudge with a spoon (or on ice cream, I suppose), and instead make MORE cupcakes, the baking process is significantly less the next time with the fudge already prepared.

Another bonus to this moist, soft cake is that when filling the cupcakes, it's not necessary to scoop out a hole first. You can just poke the piping tip into the cupcake and fill it right up! Then add some more to the top for some frosting!  And don't forget to drizzle some more of that hot fudge on top!


Delicious! This cupcake was definitely a crowd pleaser.


Peanut Butter Stuffed Hot Fudge Cupcakes
Makes 12 cupcakes
{recipe slightly adapted from Tasty Kitchen}

For the hot fudge:

    Ingredients
    • 1 cup sugar
    • 1 cup dark cocoa powder
    • 1 pinch salt
    • 2 tablespoons all-purpose flour
    • 1 cup boiling water or scalding milk
    • 1 tablespoon unsalted butter
    • 1 teaspoon vanilla extract
    Directions
      1. Combine sugar, cocoa, salt and flour in bowl of double boiler. Bring water or milk to a boil in another saucepan or in the microwave. Gradually add hot liquid to sugar mixture. Stir constantly until mixture thickens
      2. Once desired thickness is reached, remove from heat and stir in butter and vanilla. Use fudge in cupcake batter, as directed (see below), and then to drizzle over baked cupcakes. Store the rest of the sauce in the fridge for 1-2 weeks.

    For the cupcakes:

    Ingredients
    • 1 large egg
    • 3/4 cup brown sugar
    • 1/2 cup milk
    • 1/2 cup plus 1 tablespoon heavy cream
    • 1/2 cup unsalted butter, melted and cooled
    • 1 teaspoon vanilla extract
    • 2 tablespoons sour cream
    • 1 1/8 cup all-purpose flour
    • 1/4 cup dark cocoa powder
    • 1 1/4 teaspoon baking soda
    • 1/2 teaspoon salt
    • 1/4 cup homemade hot fudge (see above)
    Directions
    1. Preheat oven to 350 degrees F. Line a cupcake pan with 12 liners.
    2. In a large bowl, whisk the egg and sugar until smooth and no lumps remain. Add milk, cream, butter and vanilla and mix until combined. Stir in sour cream.
    3. In a separate bowl whisk together flour, cocoa powder, baking soda and salt. Add to wet mixture and mix until batter is smooth. Gently mix in fudge sauce.
    4. Fill cupcake liners with batter about 3/4 full. Bake for 15-18 minutes, or until toothpick comes out clean from the center. Cool cupcakes in pan for about 5 minutes before transferring to cooling rack. Let cool completely before frosting.
    For the buttercream:

    Ingredients
    • 1/2 cup salted butter, softened
    • 2/3 cup peanut butter
    • 3 cups powdered sugar (plus a possible additional 1 cup)
    • 1 tablespoon milk (have 1-2 extra tablespoons on hand)
    • 1 teaspoon vanilla extract
    Directions
    1. Cream butter and peanut butter together in bowl of electric mixer. Add powdered sugar with mixer on low speed. Then gradually add milk and vanilla extract. If too thick, add more milk; if too thin, add more sugar.
    2. Put frosting in pastry bag fitted with a tip. Poke a hole in the cooled cupcake with the pastry tip and fill the cupcake. Frost tops of cupcakes as desired. Drizzle with hot fudge sauce.