Pages

Friday, May 31, 2013

Strawberry Shortcake Scones

I know this is mainly a dessert blog and desserts don't typically include breakfast foods, but this is a baked good and it has a deliciously sweet glaze on it so....it counts in my book!


Plus I LOVE strawberries, so much so in fact, I believe they should be given their own food group. Basically, these were right up my alley. Not to mention that scones were the first thing I baked on my own as a kid and this recipe had me all nostalgic.

These babies can be served either warm or at room temperature. I didn't have much of a preference either way, but hubby liked them more at room temperature.

The ingredients for this recipe are simple- you start with flour, baking powder, sugar and salt. The next step calls for butter to be cut in with a pastry blender...which I did not have. So, after a quick Google search, I found that I could just use my food processor and pulse it for a few seconds at a time until the mixture resembled crumbs. Then you toss the strawberries into the mixture, allowing the mix to lightly coat the cut strawberries. Then you add half and half until a soft dough forms. Be sure to not over mix or knead the dough.

After patting the dough out onto a floured surface you cut out triangles and bake the scones on a parchment-lined baking sheet. Once the scones are finished and cooling, it's time to make the glaze. I dipped my cooled scones top side down into the glaze and then returned them to the cooling rack (with parchment underneath the rack to catch any drips). I tried one with just spooning the glaze on, but it was much harder for the glaze to coat the top of the scone properly, so I suggest you get your fingers a little dirty and dip them!
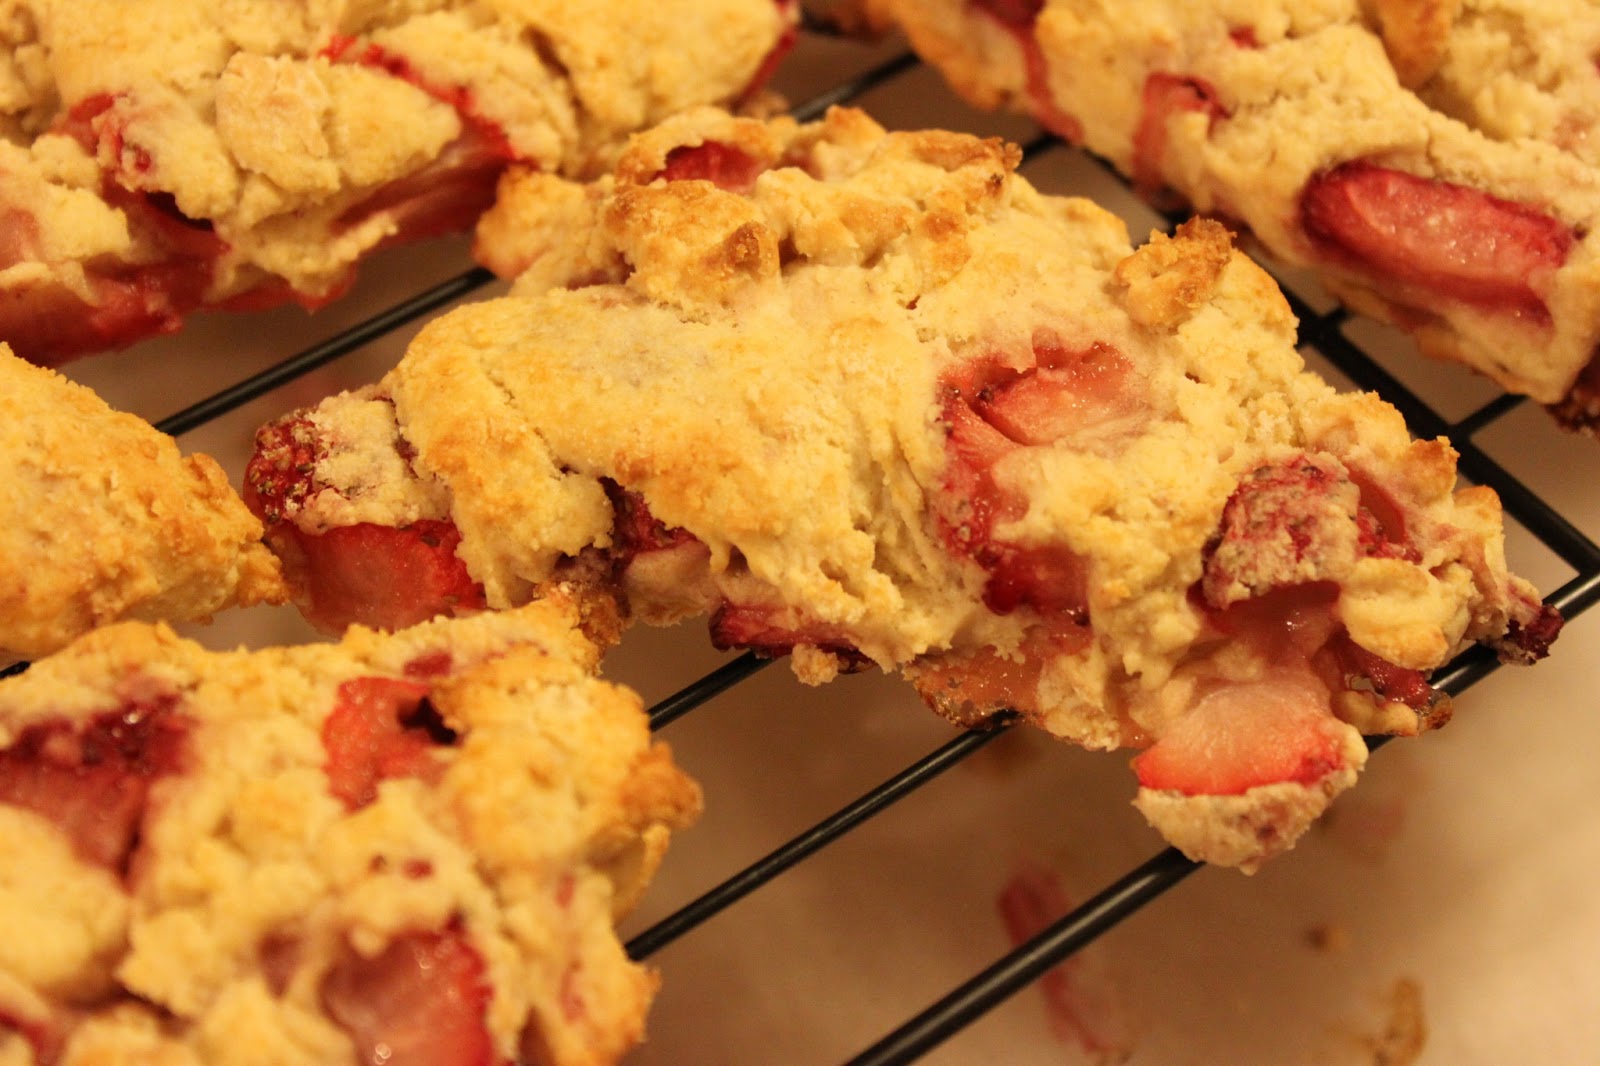
pre glaze...

post glaze...yummy!
My husband didn't even know what scones were before this (silly right?) and now he's actually requested that I make more! So you may be seeing different scone combinations on here in the near future!

Strawberry Shortcake Scones
{recipe from Alaska from Scratch}
Makes 12 scones 

For the scones:

Ingredients
  • 2 cups all-purpose flour
  • 1 tablespoon baking powder
  • 3 tablespoons sugar
  • 1/2 teaspoon salt
  • 5 tablespoons chilled butter, cut into 1/4 inch cubes
  • 12 strawberries, hulled and quartered
  • 3/4 cup half and half
Directions
  1. Preheat oven to 425 degrees F. Line a baking sheet with parchment paper or a silicone baking mat.
  2. In a large bowl, combine flour, baking powder, sugar and salt. Add butter and cut in with pastry blender until mixture resembles crumbs (I used a food processor, and pulsed for 5-second increments about 6-7 times).
  3. Toss in strawberries and coat lightly with flour mixture. Add half and half and fold together until the mixture just begins to come together and forms a soft dough (you can add more cream if needed). DO NOT KNEAD OR OVERMIX DOUGH.
  4. Turn the dough out onto a floured surface and pat into a 1-inch thick rectangle. With a sharp knife, cut the rectangle into 6 squares and then cut the squares in half diagonally to form 12 triangles. Place scones onto prepared baking sheet and bake 16-18 minutes, or until scones are cooked through and golden.
  5. Place a sheet of parchment paper underneath your cooling rack. Remove the scones from the pan and place onto the cooling rack. Cool about 10 minutes.
For the glaze:

Ingredients
  • 3 cups powdered sugar
  • 1/4 cup half and half
  • 1/2 teaspoon vanilla extract
Directions
  1. While the scones are cooling, whisk together powdered sugar, half and half and vanilla until smooth. If the glaze is too thick, add more half and half by the tablespoon. If it's too thin, add more powdered sugar by the 1/4 cup until desired consistency is reached.
  2. Take each scone by the bottom and dip them top side down directly into the glaze until the top is coated. Return scones to the cooling rack and allow glaze to drip down the sides and through the rack, onto the parchment paper. The glaze will firm up when the scones are completely cool. The scones can be served warm or at room temperature.

Friday, May 24, 2013

Chocolate Hazelnut Gelato

I know what you're thinking, and no it wasn't warm today. It almost killed me, putting on a sweatshirt this morning so I wouldn't freeze on my way to work. So why am I posting a gelato (Italy's version of ice cream) recipe? Because 2 days ago when I made it (heck, even if I had posted this yesterday), it was HOT! It's pointless complaining about the weather in this area  (although most of us will never stop talking about it if given the opportunity) because we all know it is ridiculous. Regardless, I enjoyed my ice cream thoroughly in the 80 degree weather a couple days ago.


This was the very first recipe I made with my ice cream maker. I was going to start with a regular good old vanilla ice cream recipe, but believe it or not, I didn't have all the ingredients on hand for it (and I couldn't wait to try out my machine!), but I did have everything I needed for this chocolate hazelnut gelato. And man, was it delicious. Even better, it was simple to make!

Quick side note for those who don't know exactly what gelato is. It's basically your typical "American" ice cream except it has a creamier texture. The reason for this is because it usually incorporates less fat and less air in its recipes. And boy, is it scrumptious.

I made my custard the night before so it would have a chance to fully cool in the refrigerator overnight. To make the custard, you start by mixing milk, cream and sugar in a saucepan over medium heat, cooking until the sugar dissolves. In the mean time you whip your egg yolks with some sugar in a mixer until the yolks have become thick and pale yellow in color.

whipped egg yolks and sugar
Then to temper the eggs (bring them up to the same temperature as the cream mixture so they don't curdle) you add gradually about 1/2 cup of the warm cream mixture to the egg yolks and stir until smooth. Then pour that back into the saucepan with the rest of the cream mixture and cook over low heat until it is thick enough to coat the back of a wooden spoon, about 7 - 10 minutes.

Just thick enough so if you run your finger over the back, the liquid stays separated 
Pour the mixture through a strainer to ensure maximum creaminess and then stir in vanilla and hazelnut spread (I used Nutella) until dissolved.


Cover and refrigerate until chilled. Then pour into an ice cream maker and follow the manufacturer's instructions to freeze. I popped mine in the freezer for a little bit longer afterwards so it could harden just a bit more. When it came to serving, I sprinkled some toasted, chopped hazelnuts on top. Since it was homemade (and very warm in my house) the gelato started melting faster than I expected. Of course, I gobbled up mine so fast it really wasn't a concern.


Even if it is cold out, this is definitely a treat worth making!


Chocolate Hazelnut Gelato
Makes 6-8 servings
{slightly adapted from foodnetwork.com}

Ingredients
  • 2 cups whole milk
  • 1 cup heavy cream
  • 1/2 cup sugar, divided
  • 4 egg yolks
  • 1/2 teaspoon vanilla extract
  • 1/2 cup chocolate hazelnut spread (I used Nutella)
  • 1/2 cup toasted hazelnuts, crushed, for garnish
Directions
  1. In a medium saucepan combine milk, cream and 1/4 cup of sugar over medium heat. Cook until sugar dissolves, about 5 minutes.
  2. Meanwhile, using the whisk attachment on your mixer, whip the egg yolks with the remaining 1/4 cup of sugar until the eggs become thick and pale yellow, about 4 minutes.
  3. Slowly pour 1/2 cup of warm cream mixture into the egg mixture and stir. Add this mixture back into the saucepan. Cook over very low heat, stirring constantly, until the mixture becomes thick enough to coat the back of a wooden spoon, about 7 - 10 minutes.
  4. Pour warm custard mixture through a strainer set up over a medium bowl. Stir in the vanilla and hazelnut spread until dissolved. Cover and chill the mixture completely before pouring it into an ice cream maker. Follow the manufacturer's directions to freeze. Return to freezer for 1-2 hours to harden more if desired.
  5. If desired, when ready to serve, garnish with hazelnuts.

Monday, May 20, 2013

Nutella-Swirled Peanut Butter Banana Bread


I looked over at my hanging fruit basket one day and noticed my bananas had seen better days. I had forgotten all about them, and they were getting black spots all over. Usually, they are eaten too fast to even get to this point, so I smiled, knowing just what I would do with them- banana bread!

And this banana bread is DEE-licious! Very moist, with a wonderful peanut butter flavor, and as if that wasn't enough, Nutella swirled in. Yum! I'm actually devouring a piece as I am writing this now (and doing more eating than typing). Just talking about it is making it very difficult not to go back for seconds....or I guess thirds would be the more appropriate term...

Although the bake time is a tantalizingly long 50 minutes, the batter is very simple and quick to whip together. After mixing it, pour it in a loaf pan, swirl in the Nutella and bake.for.50.minutes. Easier said than done. The aroma is amazing and yes, will make your house smell wonderful, but will also have your mouth watering to taste a piece (no worries, as you wait, you will have plenty of time to clean up that drool). My friends, it is well worth the wait and will definitely be a recipe I will make again and again.


Nutella-Swirled Peanut Butter Banana Bread
Makes 1 loaf
{recipe from sallysbakingaddiction}

Ingredients

  • 1 1/2 cups white whole wheat flour
  • 1/2 teaspoon baking soda
  • 1 1/2 teaspoons baking powder
  • 1/2 teaspoon salt
  • 3 very ripe bananas, mashed
  • 1/2 cup creamy peanut butter
  • 1/4 cup canola oil
  • 1 large egg
  • 1/3 cup white sugar
  • 1/4 cup brown sugar
  • 3/4 cup Reese's mini cups (NOT the bite-sized, the smaller ones; can also use 3/4 cup chopped Reese's Cups)
  • 1/3 cup semi-sweet chocolate chips
  • 3 heaping tablespoons Nutella
Directions
  1. Preheat oven to 350 degrees F. Spray loaf pan with nonstick spray. Set aside.
  2. In a medium bowl, stir together flour, baking soda, baking powder and salt. Set aside. In a large bowl, whisk together bananas, peanut butter, canola oil, egg and sugars.
  3. Pour dry ingredients into wet ingredients and stir until just combined. DO NOT OVERMIX! Fold in Reese's mini cups and chocolate chips. Pour batter into prepared pan. Drop 3 heaping tablespoons of Nutella in a line on top of the batter. Swirl Nutella with a knife.
  4. Bake for 50 minutes or until a toothpick inserted into the center comes out clean.
  5. Let cool in the pan for about 10 minutes, then loosen the edges with a knife and remove from loaf pan. Transfer to a cooling rack. Allow bread to completely cool before cutting into it.


Friday, May 17, 2013

Peanut Butter and Crème Fraîche Cheesecake with Pretzel Crust and Chocolate Whipped Cream

Honestly, who doesn't like peanut  butter? I guess those people probably exist in the world, but, you have to wonder, can they really be trusted? (just kidding peanut butter haters ;)) In all seriousness though, if you love peanut butter...TRY THIS RECIPE. If you  don't (<1% of the population, I bet), obviously, this is not the recipe for you. I mean, posting the photo online alone, had my mom calling me wondering why she hadn't gotten one to try yet. And you don't want to upset an Italian woman when it comes to desserts. That is some serious fury.


This all started with another birthday present (gotta love birthdays)- a mini cheesecake pan!  I was very excited to try a recipe I found on The Korean American Mommy. I just added chocolate whipped cream on top to add another layer of flavor. 

Let's get to the good stuff:
Place the bottoms into the mini cheesecake pan. Grease the pan. Then make up your pretzel crust and gently press it so it covers the bottom and 1/3 of the way up the sides. I didn't put that much crust in all of the cups, and afterwards, I felt that I really should have. It seemed like the ones with a little more crust were able to come out of the pan easier.


Mix the batter together and spoon it into the cups. You can fill them almost all the way full. I filled mine about 80% full and could have even gone higher. Since I didn't fill them as high, I wound up with 12 mini cheesecakes from the pan and then had enough extra to make two 4 inch little cheesecakes in mini springform pans.

The not-as-mini mini cheesecake

Bake for 15 - 18 minutes (I baked the larger ones for 25-30 minutes) and then let cool in the pan for 10 minutes. Transfer pan to wire rack to cool completely. Once completely cool, cover and place in refrigerator for at least 3 hours.

And what goes good with peanut butter? Chocolate, of course. So I made some chocolate whipped cream to put on top and sprinkled them with some extra pretzel crumbs. Delicious!

Oh, and before I forget! The original post said that she had some leaking from her mini cheesecake pan so she placed a baking sheet underneath...I didn't even bother testing it without the pan underneath and it worked out great! There didn't seem to be any drippings onto the baking sheet, but better safe than sorry!

Hubby wouldn't try these ones, because he hates cream cheese (*gasp*). It really is a sin (perhaps on par with peanut butter haters?), and he misses out on many of my delicious baked goods because of this, but it was definitely a hit with everyone else who tasted them!

Peanut Butter and Crème Fraîche Cheesecake with Pretzel Crust and Chocolate Whipped Cream
{cheesecake recipe from Korean American Mommy}
Makes about 12 mini cheesecakes

For the cheesecake:

Ingredients
  • 12 ounces cream cheese
  • 8 oz créme fraîche
  • 1 cup sugar, divided (half is for crust)
  • 2 eggs
  • 1/4 cup heavy cream
  • 1 teaspoon vanilla extract
  • 2 heaping tablespoons peanut butter
  • 2 cups pretzel crumbs (crust)
  • 8 tablespoons unsalted butter, melted and cooled (crust)
Directions
  1. Preheat the oven to 325 degrees F.
  2. In a medium bowl, combine pretzel crumbs, melted butter and 1/2 cup of the sugar. Stir until well blended.
  3. Follow the instructions on your mini cheesecake pan and place the removable discs into the bottom of the pan. Grease each individual form. Place about 2 teaspoons of the pretzel mixture into each of the forms and gently press down with a spoon. The crust should cover the bottom and about 1/3 of the way up the sides. 
  4. Using an electric mixer, combine cream cheese, créme fraîche, and the remaining 1/2 cup of sugar. Beat on medium speed until smooth. Add eggs, heavy cream, vanilla, and peanut butter and continue to beat until smooth.
  5. Spoon the cheesecake batter into the forms. They should be filled almost to the top (about 90% full). Bake for 15-18 minutes, or until set. Transfer the pan to a wire rack and let the cheesecakes cool to room temperature before refrigerating for at least 3 hours. Remove cheesecakes (carefully) from the pans by pushing up the bottoms of each cheesecake form.
 For the chocolate whipped cream:

Ingredients
  • 1/4 cup powdered sugar
  • 2 tablespoons unsweetened cocoa powder
  • 1 tablespoon whole milk
  • 1/2 cup heavy cream
  • 1/4 teaspoon unflavored gelatin (if not serving immediately)
  • 1  teaspoon water (if not serving immediately)
Directions

Whisk powdered sugar, cocoa powder, and milk in a small bowl until smooth. Cover and refrigerate until cream is whipped. Using an electric mixer, or stand mixer with whisk attachment, gradually beat cream together with the chocolate mixture until soft peaks form. If not serving immediately (this will keep the whipped cream from getting liquidy), dissolve gelatin in water by placing in the microwave for about 10 seconds. Allow to cool slightly, then add to cream mixture and continue to beat until stiff peaks form.

After cheesecakes have been refrigerated and removed from pan, frost with whipped cream and garnish with extra pretzel crumbs, if desired.

Saturday, May 11, 2013

Pecan Pie Cupcakes

In the process of making these cupcakes, there was a great debate- is it pronounced puh-kahn or pee-can? Personally, I couldn't decide and would use whichever one I was in the mood for. Looking at them spelled out like this though, I must say, that I am leaning towards puh-kahn. Why, you may ask? Simply because the other version involves typing the word pee-can and that does not instill the idea of a delicious nut in my mind...it makes me think of...well, you know.
Anyway, I digress (in case your wondering, Merriam-Webster agrees with me, although I'm not sure it's for the same reason). Onto the cupcakes!
The recipe for these cupcakes is based on a pecan pie cake recipe from here and I just couldn't resist miniaturizing it (I know you are shocked). They turned out amazing! And the husband agrees- the recipe is definitely a winner!


I guess I should begin with what I should have started with- the filling. I was so excited about the cake part that I skipped right over the filling and the fact that it needed  to be refrigerated at least 4 hours (I know, shame on me...that's like the first rule of any form of cooking... read the recipe ALL the way through first...). It ended up being okay though, just made for some midnight baking and a few darker photos (sorry!).

The filling was not hard to make. I've made a few custard-type recipes now and feel pretty confident in how things should go in the process. The worst part was waiting for it to be ready so I could complete the cupcakes...hence why you should make it first (perhaps even the day before)!

Anyway, onto the cupcakes- start by crushing your pecans. I food processed mine with a little bit of sugar. It seemed that the smaller the pieces, the better they stuck to the pan (you will understand in a second). Generously butter your cupcake pan and then sprinkle on some pecan pieces. You most likely won't be able to get them all the way up the sides (at least I couldn't), but half way worked well enough.


Mix up the batter, fill the cups about 3/4 full and bake them for 15-18 minutes. I let them cool in the pans for 10 minutes and then slid a knife around the edges to loosen the cupcakes in order to remove them from the pan. I tried just inverting the pan, but I lost half of a bottom of a cupcake that way (and happily ate that piece). Using the knife was a much safer way of removing them.


Coat the sides of the cupcakes with dark corn syrup using a brush and allow to completely cool before moving onto the next step.

Once cool, cut holes in the cupcakes and fill with the custard.


Then top with cinnamon custard whipped cream, roasted pecans and caramel...mmm.


Enjoy!

Pecan Pie Cupcakes
Makes about 30 cupcakes
{adapted from  Jo and Sue}

For the pecan pie filling:

Ingredients
  • 1/2 cup packed brown sugar
  • 3/4 cup dark corn syrup
  • 1/3 cup cornstarch
  • 4 egg yolks
  • 1 1/2 cups half-and-half
  • 1 pinch salt
  • 3 tablespoons butter
  • 1 teaspoon vanilla extract
Directions

Whisk together the first 6 ingredients in a large saucepan until smooth. Bring to a boil over medium heat, whisking constantly. Continue whisking, and allow to boil for 1 minute or until thickened. Remove from heat and whisk in butter and vanilla. Transfer to a bowl and gently press a layer of plastic wrap on the custard to prevent a skin from forming. Refrigerate for at least 4 hours.

 For the cupcakes:

Ingredients
  • 3 cups pecans, finely chopped
  • 1/2 cup unsalted butter, softened
  • 1/2 cup shortening
  • 2 cups sugar
  • 5 eggs, separated
  • 1 tablespoon vanilla extract
  • 2 cups all-purpose flour
  • 1 teaspoon baking soda
  • 1 cup buttermilk
  • 3/4 cup dark corn syrup (to brush on after baked)
  • 1/4 cup roasted pecans, crushed (garnish)
  • caramel topping (garnish)
Directions
  1. Preheat the oven to 350 degrees F. Generously butter your cupcake pans. Divide 2 cups of the finely chopped pecans (I food processed mine with a teaspoon of sugar from the 2 cups of sugar needed in the recipe) between the cupcake cups, lining the bottom and sides of each cup with nuts the best you can.
  2. Using an electric mixer, beat butter and shortening on medium speed until fluffy. Gradually add sugar, beating well. Add egg yolks, 1 at a time, blending until just combined after each addition. Stir in vanilla.
  3. In a separate bowl, combine flour and baking soda. Gradually add to butter mixture, alternating with buttermilk, beginning and ending with flour mixture. Beat at low speed after each addition. Stir in remaining 1 cup of pecans.
  4. Transfer batter to a new bowl and clean mixer. Using the whisk attachment, beat the egg whites on medium speed until stiff peaks form. Fold 1/3 of egg whites into the batter to "lighten" it up. Then gently fold in remaining egg whites.
  5. Fill prepared cups 3/4 full with batter. Bake for 15-18 minutes, or until a toothpick inserted into the center comes out clean.
  6. Cool in pans for about 10 minutes, then transfer to a wire rack (you may need to slide a knife around the sides of the cupcakes to loosen from the pan). Brush the sides of each cupcake with dark corn syrup and allow the cupcakes to cool completely.
For the cinnamon custard whipped cream frosting:

Ingredients
  • 2 cups heavy cream
  • 1 tablespoon sugar
  • 1/2 teaspoon cinnamon
  • 1 cup pecan pie filling
Directions

Whip the cream on high speed until soft peaks form. Add the sugar and cinnamon, then continue to whip until stiff peaks form. Gently stir in 1 cup of the pecan pie filling until just combined.

Assembly

Make a hole in the cooled cupcakes using the cone method (cut a cone shape out of the top of the cupcake, then cut the pointed bottom off to leave you with a flat circular piece of cake to place back over the hole after filling). Fill the cupcakes with the pecan pie filling and then replace top of cupcake. Frost with cinnamon custard whipped cream. If desired, garnish with roasted, crushed pecans and drizzle with caramel.

Sunday, May 5, 2013

Piñata Sugar Cookies


Aren't these so cute? I must admit, these were a little bit of a learning experience and if I were to make them again, they would look much better (see the glue job I did on the leg in the photo below?). But all in all, they came out well and they were yummy!


These cookies involved quite the process, so I may as well start now. First you make the dough, which was very simple. Separate the dough into 5 large balls and 1 smaller ball. Simple enough right? Apparently not… I could not count and did 4 large balls and 1 small ball at first. Luckily, I realized in time (not that it would really have been a big deal- you can do as many, or as little, colors as you want), and was able to create a small ball from the other colors and make it black.


I found it super easy, and much less messy to mix the food coloring in with my mixer. Within a minute I had an evenly colored ball of dough and very minimal food coloring on my hands! Hooray!

After the dough balls were colored, I layered the colors in a Pyrex loaf pan lined with plastic wrap and then popped it in the freezer. When it came time to removing the frozen dough from the pan, it was a little difficult though. I had to make my husband wedge it out with a knife (I was too chicken- I thought I would definitely ruin it). If I had used a plastic container instead, it may have come out easier, since the plastic has more give to it. The other thing you want to be sure of is that your container is at least the width and height of your cookie cutter.


Once the dough was out of the container, it was easy to slice it into ¼” slices, but with the warmer weather, those individual slices unfroze quickly which made them harder to transfer to the pan. I found that sliding a knife under the pieces for support worked very well when moving them to the baking sheet.


IMMEDIATELY after they are baked you have to cut them with the cookie cutter (they crumble the more that they start to cool). The thing is, I don’t own a donkey cookie cutter, so I decided to make my own out of a plastic bottle and wire.

Tada!
Cute right? Except that 2 minutes before my first batch of cookies was done, I realized that maybe it wasn’t the best idea to cut HOT cookies with my PLASTIC cookie cutter. So, I scrambled, and decided to quickly cover the makeshift cookie cutter with aluminum foil. Basically, a whole lot of unnecessary stress over a cookie cutter. But, that’s my life. Anyway, it ended up working pretty well. The only thing I would do differently is only bake one pan at a time, or at least at different intervals. The cookies cool fairly quickly, and, as I said earlier, they begin to crumble when they are cut. Baking 2 pans worth at a time and trying to cut them all made for some cookies that crumbled a bit.

Another tip- it's easiest to work in batches of 3 cookies when cutting the cookies- cut 2 with the cutter in one direction and then 1 with the cutter flipped over to get a donkey facing the other direction. Then cut the legs and ear off of 1 of the 2 donkeys facing the same direction, and also cut the center out of the same cookie using a square or oval cookie cutter (I just used a knife). I would have a picture here of what your 3 pieces should look like for each cookie, but I messed up this part and accidentally cut into the 1 facing the opposite direction (for ALL of my cookies...oops)so one side of my finished cookies wasn't as pretty. No one seemed to complain though!

After they are cool, you can start layering the cookies. Place one cookie with the baked bottom side up and pipe on the frosting glue (you don't need to put any on the legs or head). Then put the middle cookie on, fill the hole with some mini M&M's and pipe some more frosting glue around it. Finally, you can put the last cookie on (baked bottom side in). Let them sit for 30 minutes before standing them upright so that the frosting can dry.


Sorry, the photos are dark...I was doing some late night baking!

Happy Cinco de Mayo!


Piñata Sugar Cookies

{recipe from sheknows}
Makes 6 - 8 piñata cookies

Ingredients

  • 1 cup granulated sugar
  • 1 cup powdered sugar
  • 1 cup butter
  • 1 cup vegetable oil
  • 2 eggs
  • 1 teaspoon cream of tartar
  • 1 teaspoon salt
  • 1 teaspoon baking soda
  • 5 cups flour
  • 1 teaspoon almond extract
  • 1 tablespoon vanilla
  • Mini M&M's
  • 1/2 cup powdered sugar (for the frosting)
  • 2 teaspoons milk (for the frosting)
Directions
  1. Cream the sugars with the butter until light and fluffy. Beat in the eggs. Then add the oil. Combine dry ingredients together in a large bowl and then gradually add them to the liquid mixture. Mix in vanilla and almond extract.
  2. Split the dough into 5 even-sized balls and 1 smaller ball (to be the black one). Add food coloring until the desired color is achieved.
  3. Line a container that is about the same width/height as your donkey cookie cutter (I used a loaf pan, but a plastic container may work better) with plastic wrap. Start with the black dough on the bottom. If you want to alternate the colors twice (as I did) split the colored dough balls in two, layer them in any order, and then repeat in the same order. I found the easiest way to do this was to crumble the dough over the entire area where you were putting it and then flattening it down. Cover the dough and freeze for 4 hours or overnight.
  4. Remove the dough from the container and unwrap the plastic wrap. Cut 1/4" slices and place them on parchment lined baking sheets. Bake them at 350 degrees F for 12 minutes. They may seem a little soft when you take them out, but they need to be in order to be cut.
  5. Immediately after the cookies are taken out of the oven (work fast! the cookies crumble once they are too cool) use your cookie cutter to cut the donkey shapes. Working in sets of 3, make 2 of the cuts the same direction and one facing the opposite direction (flip the cookie cutter over). This way you will be able to hide the baked bottom sides on the inside of the cookie.
  6. For the middle cookie in each set (this will be 1 of the 2 you cut in the SAME direction in your sets of 3), use a small square/rectangular/oval cookie cutter (I just used a knife but that took more time) to cut  a hole in the middle. You can also cut the ears and legs off of your middle cookies. Let the cookies cool on the baking sheet before moving them and removing the excess outer cookie.
  7. Before assembling, make your frosting "glue" by whisking 1/2 cup powdered sugar and 2 teaspoons of milk in a small bowl until smooth. Place in a small Ziploc bag with a small hole cut out of the corner for easier piping.
  8. To assemble, place 1 donkey cookie with the baked bottom side up. Outline the center of the piñata body with the frosting glue (no need to outline the ears, legs, or where the hole will be on the next cookie). Put the middle cookie on top of the frosting glue and and your mini M&M's in the hole. Outline the middle cookie with the frosting glue and then place the opposite-cut donkey cookie on top (so that the baked bottom side is facing in). Let them sit for at least 30 minutes before standing them upright.

Friday, May 3, 2013

Piñata Chocolate Churro Cupcakes

Cinco de Mayo is this Sunday so this is the perfect treat to kick off the weekend (I have something planned for the day of too that I'm very excited for!)! I first saw these cinnamon chocolate churro cupcakes and then saw this piñata cake and could not decide which one I wanted to make so I figured, why not combine them?

Also, thanks to my birthday last week, I got a new, large piping tip! :) I was excited to try it out! And now, I'm in love!
 What do you think?

First you make the cupcakes, and then make a hole in them. Fill it about half way with mini M&M's (about 10 M&M's).

Then hide those M&M's with some of the extra cake pieces cut off from the cone used to make the hole.
Can't even tell there's anything underneath!
Then put a spoonful of pudding on top...

And finally, cover that baby back up!
I know that it's sticking up a little, but the frosting will cover it
Oh yeah, and don't forget the frosting!

Now, these were delicious, but there was one downside. The cake was so moist that the M&M's inside started to lose their coloring....obviously this didn't change the taste at all, but it did make them look a little strange inside. So if I were to use the recipe for the cake again (which I can see myself doing again...and again...and again..) as a piñata cupcake, I'd probably fill it with just sprinkles (yum!).

Happy early Cinco de Mayo!


Piñata Chocolate Churro Cupcakes
Makes about 12 cupcakes

For the cupcake:
{recipe from love and olive oil}

Ingredients
  • 1 1/4 cups all-purpose flour
  • 2 tablespoons cornstarch
  • 3/4 teaspoon baking powder
  • 1/2 teaspoon baking soda
  • 1/2 teaspoon salt
  • 1 teaspoon cinnamon
  • 1 cup soy milk (that's what I had on hand...the original recipe calls for the same amount of almond milk)
  • 1 teaspoon apple cider vinegar
  • 3/4 cup granulated sugar
  • 1/3 cup vegetable oil
  • 1 teaspoon vanilla extract
  • 1/2 cup mini M&M's (or any small candy of your choice)
Directions
  1. Preheat the oven to 350 degrees F. Line a cupcake pan with 12 liners.
  2. In a large bowl, sift together flour, cornstarch, baking powder, baking soda, salt and cinnamon. Set aside.
  3. Combine milk and vinegar in a medium bowl and stir to combine. Whisk in sugar, oil and vanilla. Make a well in the center of the dry ingredients and pour in the wet ingredients. Mix until mostly smooth (there will still be some lumps). 
  4. Fill the liners with about 3 tablespoons of batter (just under 2/3 full). Bake for 20-22 minutes or until a toothpick inserted into the center comes out clean. Transfer to a cooling rack to cool completely.
For the filling
{recipe from love and olive oil}

Ingredients
  • 2 tablespoons cornstarch
  • 1/4 cup sugar
  • 1/8 teaspoon salt
  • 1/2 teaspoon cinnamon
  • 1 1/2 cups whole milk
  • 3 ounces semisweet or dark chocolate, coarsely chopped
  • 1/2 teaspoon vanilla extract
Directions

Combine the cornstarch, sugar, salt and cinnamon in a heatproof bowl set over a saucepan with 1 inch of simmering water (or in the top of a double boiler). Slowly whisk in the milk, scraping the bottom and sides of the bowl with a heatproof spatula to incorporate all ingredients. Stir occasionally and use whisk if any lumps form. Leave over heat for 15-20 minutes, until mixture begins to thicken and coats the back of the spatula. Then add the chocolate. Continue stirring for 2-4 minutes, until pudding is smooth and thickened. Remove from heat and stir in vanilla. Transfer to small bowl and cover, gently pressing a layer of plastic wrap against the surface of the pudding before refrigerating (this prevents a layer of skin from forming on the pudding). Refrigerate for at least 30 minutes and up to 3 days.

For the frosting
{adapted from love and olive oil}

Ingredients
  • 1/2 cup powdered sugar
  • 1/4 cup unsweetened cocoa powder
  • 2 tablespoons whole milk
  • 1 pinch of cinnamon
  • 1 cup heavy cream
  • 1/2 teaspoon unflavored gelatin
  • 1 1/2 teaspoons water
Directions

Whisk powdered sugar, cocoa powder, milk and cinnamon in a small bowl until smooth. Cover and refrigerate until well chilled, about 30 minutes. Using an electric mixer, or stand mixer with whisk attachment, gradually beat cream together with the chocolate mixture until soft peaks form. Dissolve gelatin in water by placing in the microwave for about 10 seconds. Allow to cool slightly, then add to cream mixture and continue to beat until stiff peaks form.

Assembly
Cut out cones from the tops of the cupcakes, about 1 inch in diameter, to make a hole in the cupcakes. Set cones aside, but do not discard. Place about 10 M&M's in the bottom of each cupcake. Then cut the bottoms off of the cones and use that extra cake to hide the M&M's on the bottom. Then spoon about a tablespoon of the pudding filling on top of that layer. Replace the tops to the cupcakes and frost with the chocolate cinnamon whipped cream frosting. Prior to serving, sprinkle cupcakes with cinnamon sugar (if desired).